Imagine you are finally ready to mount a heavy mirror in your Indianapolis living room, but every drill bit hit results in hollow air or the terrifying resistance of an electrical wire. It is a common frustration for many of our neighbors who want to improve their space without causing structural damage. You deserve to feel confident that your walls can support the weight of your family’s memories. Understanding exactly how many inches are between wall studs is the first step toward a safe and professional result.
We understand that uncertainty. Under the 2020 Indiana Residential Code, standard spacing is typically 16 or 24 inches on center, but older homes in Westfield often follow their own rules. This guide will help you identify these hidden structural patterns and explain when a professional inspection is necessary to protect your investment. Your home’s safety is our pride, and we are here to help you make informed decisions. We will cover the differences in spacing, the latest radar imaging technology for finding studs, and how to spot non-standard construction before it becomes a costly problem.
Key Takeaways
- Learn how the 2020 Indiana Residential Code defines standard “on-center” spacing to ensure your wall hangings are anchored securely.
- Discover exactly how many inches are between wall studs in modern Hamilton County builds versus the unique, irregular framing of historic Indianapolis homes.
- Master practical DIY methods like the “Corner Start” technique to locate structural support without relying solely on inconsistent electronic tools.
- Identify structural red flags such as “drywall pops” and bowed walls that signal potential framing fatigue or poor construction.
- Understand why professional multi-point inspections provide the clarity needed to distinguish between a solid stud and dangerous electrical conduits.
Standard Wall Stud Spacing: How Many Inches Are Between Studs?
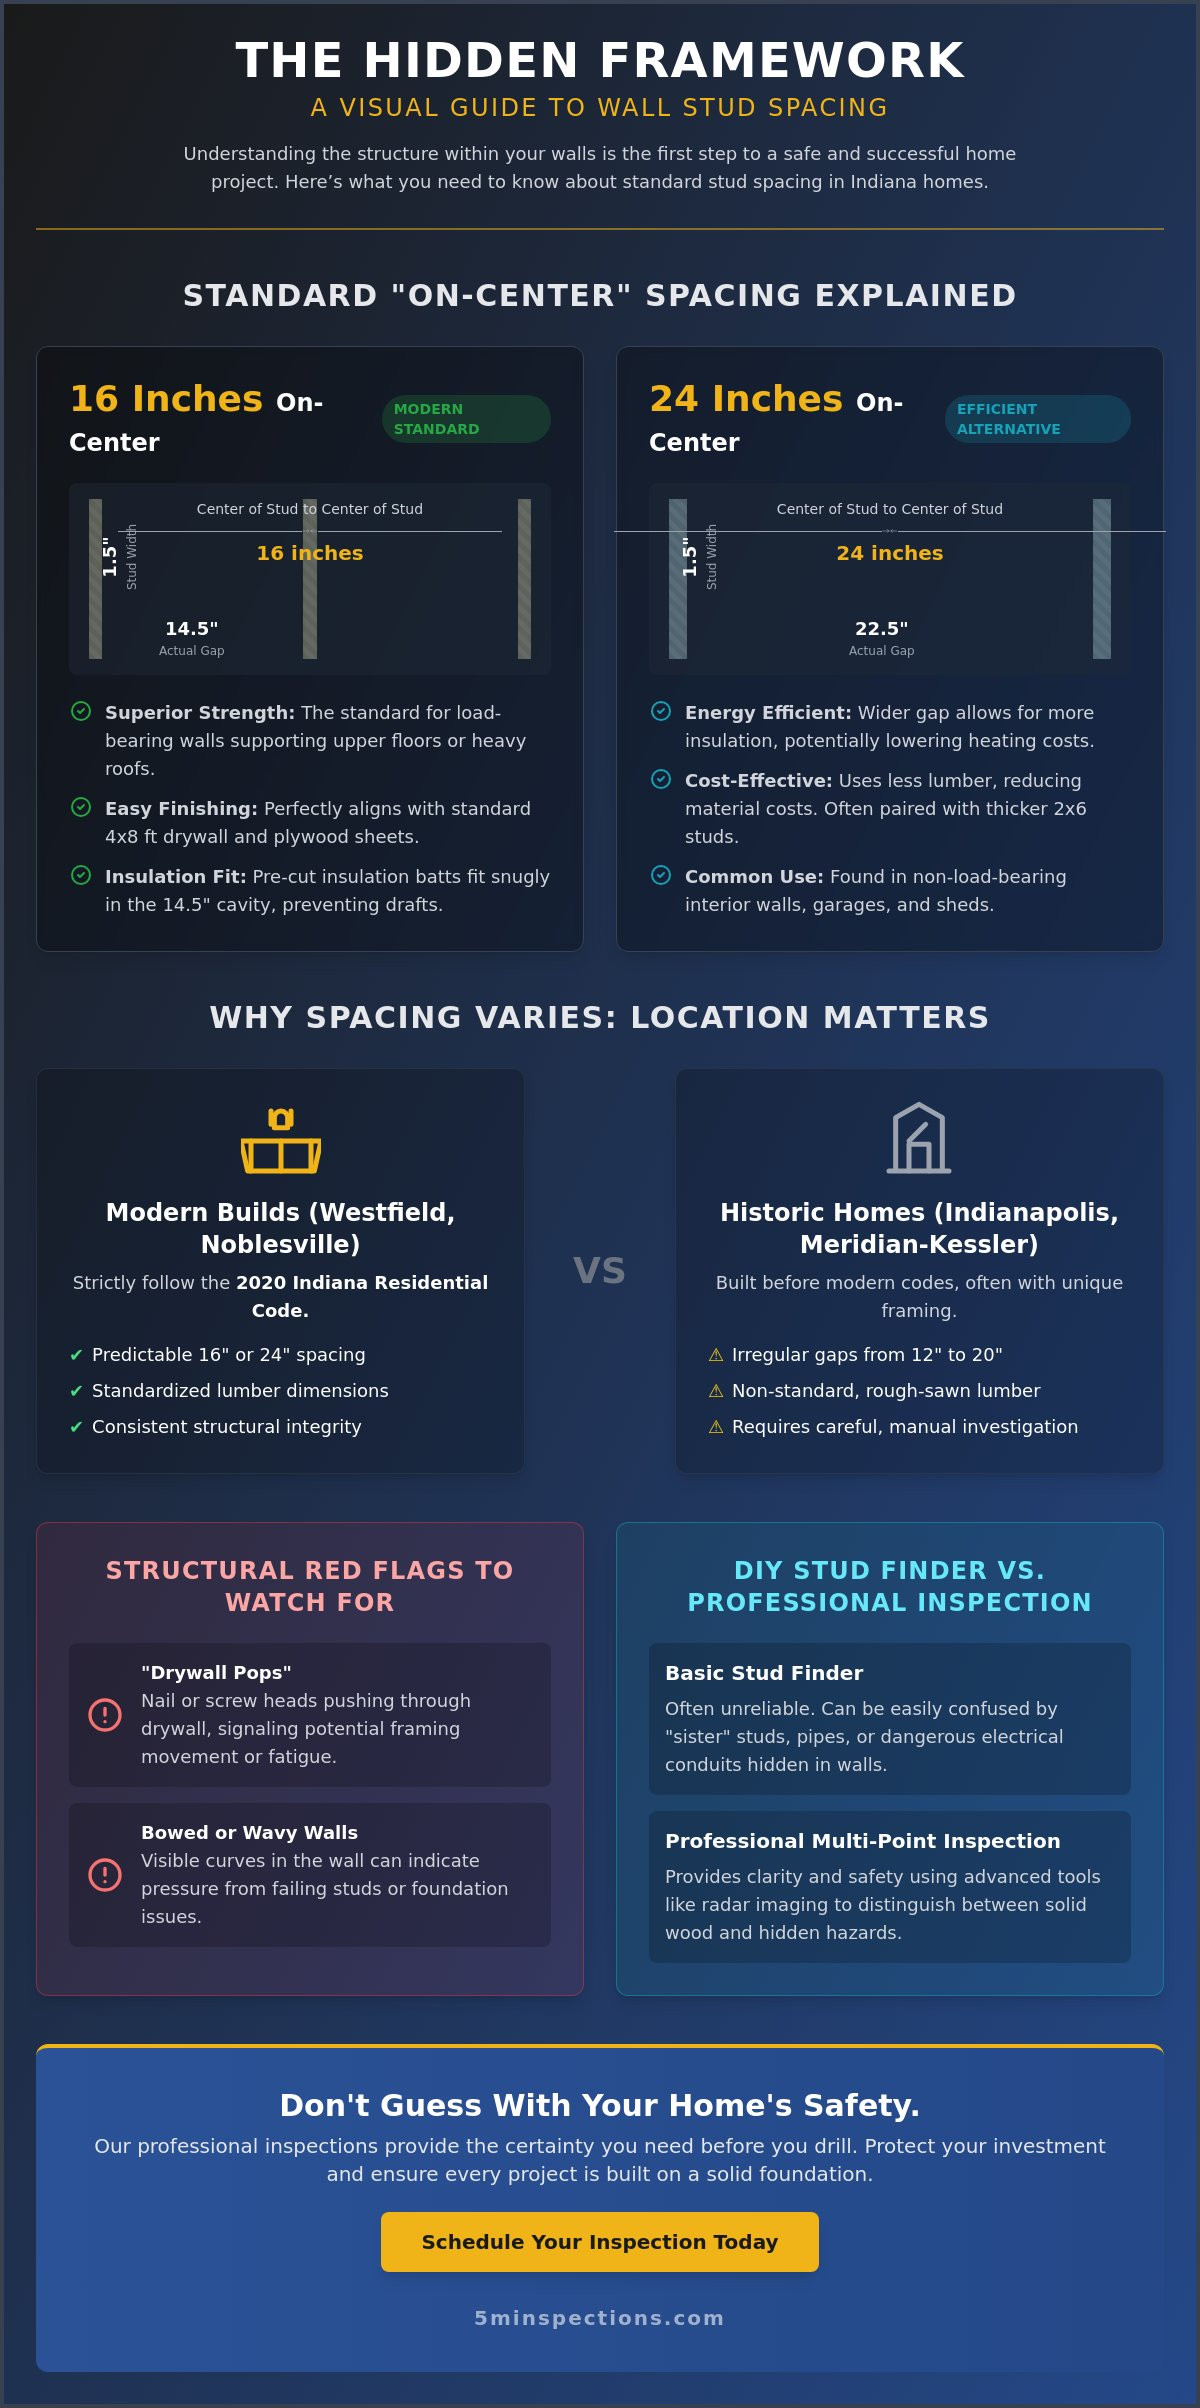
When you are planning a home improvement project, the first question you need to answer is how many inches are between wall studs in your specific room. For the vast majority of modern homes in Central Indiana, the industry standard is 16 inches “on-center” (OC). This measurement is a fundamental building block of residential construction. It ensures that the “bones” of your home are strong enough to support the weight of the roof and upper floors. It also creates a predictable grid for everything that follows, from insulation to the drywall that finishes your living space.
Understanding “on-center” is where many DIY enthusiasts run into trouble. This term means you are measuring from the exact center of one vertical stud to the center of the next. It is not the measurement of the empty space between the pieces of wood. Because a standard “2×4” stud is actually 1.5 inches wide, the physical gap between two studs is usually 14.5 inches. For most residential projects, the Standard Wall Stud Spacing of 16 inches is used because it aligns perfectly with standard 4×8 foot sheets of plywood and drywall. This allows the edge of every sheet to land directly in the middle of a stud for secure fastening.
The 16-Inch Rule: The Modern Residential Standard
In the suburban developments surrounding Indianapolis and Westfield, 16-inch spacing is the go-to choice for load-bearing walls. This tighter interval provides superior vertical strength. It’s essential for supporting second stories or heavy roofing materials during Indiana’s winter snow loads. Beyond structural integrity, this spacing makes finishing your home much easier. Standard fiberglass insulation batts are pre-cut to fit the 14.5-inch cavity created by 16-inch OC framing. This ensures a snug fit that prevents drafts and keeps your energy bills manageable. We frequently see this pattern in homes built under the 2020 Indiana Residential Code, as it offers a reliable balance of material cost and structural safety.
24-Inch Spacing: Utility and Efficiency
You might occasionally find 24-inch spacing, particularly in “advanced framing” or “green” builds designed for maximum energy efficiency. This wider gap reduces the amount of lumber used and leaves more room for insulation, which can lower heating costs. However, to maintain safety, builders typically use thicker 2×6 studs instead of the standard 2x4s when spacing is this wide. You are most likely to encounter 24-inch intervals in non-load-bearing interior walls, detached garages, or sheds. While it saves on material costs, it can make mounting heavy cabinets or televisions more difficult, as there are fewer anchor points available in the wall.
Why Stud Spacing Varies Across Indianapolis and Westfield Homes
Every home in Central Indiana tells a story through its construction. If you live in a historic Meridian-Kessler bungalow, you will quickly find that the “standard” 16-inch rule often disappears. In these older properties, builders frequently used rough-sawn lumber with irregular intervals. It is not uncommon to find gaps ranging from 12 to 20 inches. This inconsistency makes it difficult to know how many inches are between wall studs without a thorough investigation. Modern developments in Westfield and Noblesville are much more predictable because they must strictly follow the 2020 Indiana Residential Code. These regulations ensure that every new build meets specific industry standards for stud spacing to guarantee structural safety.
The function of the wall also dictates the density of the timber inside. Load-bearing walls, which carry the weight of your home’s roof or upper floors, almost always feature 16-inch spacing to prevent sagging. Interior partition walls that don’t support weight sometimes offer more flexibility. You should also watch for “sister” studs. These are extra vertical members placed next to windows and door headers. They provide the necessary reinforcement for large openings but can easily confuse a basic stud finder by creating a solid block of wood where you expect a gap.
Load-Bearing vs. Non-Load-Bearing Patterns
Load-bearing walls are the backbone of your property. They require consistent, tight spacing to transfer weight down to the foundation. You can often identify these walls by looking at the joists in your basement or attic; they usually run perpendicular to the load-bearing studs. Partition walls are different. In some older Indianapolis homes, builders spaced these studs further apart because they only needed to support the weight of the plaster or drywall. If you are planning a renovation, a certified home inspection can help you identify which walls are critical to your home’s stability before you start swinging a sledgehammer.
Regional Construction Eras in Central Indiana
The post-war housing boom of the 1940s and 50s brought mass production to Indianapolis. This era cemented the 16-inch standard we see in neighborhoods like Irvington or Broad Ripple. In contrast, the current construction surge in Hamilton County, where builders filed 10,173 permits in 2025, reflects a highly disciplined approach. These new homes use engineered lumber and precise measurements. However, custom luxury homes in Carmel may feature 12-inch spacing. This extra support is often necessary for heavy architectural details like floor-to-ceiling stone fireplaces or thick marble tiling in bathrooms. Knowing how many inches are between wall studs in these high-end builds requires understanding these specialized structural needs.
Practical Tips: How to Find Wall Studs in Your Home
Locating the structural support behind your drywall doesn’t always require expensive gadgets. Most framing projects begin at the corner of a room, making corners your most reliable starting point. Once you identify the corner stud, you can use a tape measure to estimate where the next one should be based on how many inches are between wall studs in your home’s era. If you live in a modern Westfield subdivision, measuring 16 inches from the corner usually lands you right on the money. However, keep in mind that the first stud might be slightly less than 16 inches away because the measurement starts from the very edge of the wall, not the center of the corner post.
The “Knock Test” remains a favorite for a reason. Use your knuckle to tap firmly along the wall. A hollow, echoing ring indicates the space between studs, while a dull, solid thud signals you’ve found a vertical member. If your hearing isn’t quite that sharp, try the flashlight trick. Dim the room lights and hold a bright flashlight flush against the wall at a steep angle. This “raking light” highlights subtle imperfections in the drywall finish. You will often see the faint vertical lines of mud joints or tiny dimples where screw heads were covered, revealing the exact path of the timber underneath.
For a more technical DIY approach, use a high-strength neodymium magnet. Drywall is secured to the framing with metal screws or nails. By sliding a magnet in a “Z” pattern across the wall, you can feel it tug when it passes over a fastener. Since these fasteners are driven directly into the wood, a vertical line of magnetic “catches” is a certain sign of a stud. This method is often more accurate than cheap electronic sensors that can be fooled by varying wall thicknesses.
Using Visual Clues: Outlets and Trim
Electrical outlets are excellent “cheat codes” for finding studs. In residential wall framing construction, electricians almost always nail the plastic or metal outlet box to the side of a stud. You can usually determine which side the stud is on by removing the cover plate and looking for the visible nail or by gently tapping the wall on either side. Additionally, check your baseboards and crown molding. Carpenters prefer to drive finishing nails into studs for a secure hold. Look for tiny, filled circular indentations in the trim; these are clear markers of the structural bones hiding behind the paint.
When the Standard Measurement Fails
Standard measurements can sometimes lead you astray. Builders often use “California Corners” or specialized intersections that allow for better insulation but create non-standard gaps at wall junctions. If you find a stud at an odd interval like 12 or 18 inches, don’t panic. This often occurs near windows, doors, or corners where extra support was required. Be cautious of “phantom studs.” Horizontal fire blocking or plumbing pipes can produce a solid sound during a knock test. Referencing a guide on residential wall framing construction can help you understand these complex layouts. If you hit something that feels too hard or “springy,” stop drilling immediately to avoid puncturing a water line or electrical conduit.
Structural Red Flags: What Stud Spacing Says About Safety
Your walls do more than just hold up your family photos; they are the literal skeleton of your home. When that skeleton is compromised, the signs are often visible if you know where to look. Bowed or leaning walls are a major red flag. This often happens when a builder ignores how many inches are between wall studs required for a load-bearing wall, leading to long-term structural fatigue. Over time, the weight of the roof can cause these improperly spaced studs to flex or “creep,” resulting in a wall that visibly curves. In Central Indiana homes, especially those subjected to heavy seasonal wind and snow, this lack of support can lead to catastrophic failure if it isn’t addressed early.
Another common indicator of framing trouble is the “drywall pop.” These are small, circular bumps or cracks in your paint where a nail or screw has pulled away from the wood. While a few pops in a new home are normal settling, a cluster of them often signals that the studs are shifting or were spaced too far apart to handle the wall’s tension. During a Buyer’s Home Inspection, we meticulously check for these patterns to ensure the home’s bones are as solid as they look on the surface. We also look for fire blocking, which are horizontal studs placed between vertical ones. These are critical for safety because they slow the spread of flames inside a wall cavity during a fire. When reviewing your inspection report, be sure to also watch for electrical concerns like a double tapped breaker, which can pose serious overheating risks that are just as important to address as structural framing issues.
Missing Studs and Structural Integrity
In the rush of a “DIY” renovation, some homeowners accidentally remove vital supports to create an open-concept feel. If you notice saggy ceilings or a dipping roofline, it’s often because the wall studs no longer align with the rafters above. This misalignment prevents weight from transferring safely to the foundation. A New Construction Inspection is the best way to catch these framing errors before the drywall hides them forever. If you suspect your home’s previous owner took a shortcut, you should schedule a structural consultation to verify your home’s stability.
Moisture and Mold: Hidden Stud Issues
Even if the original builder knew how many inches are between wall studs for a perfect frame, moisture can ruin that integrity. Rotted studs from hidden pipe leaks or window failures lose their ability to hold fasteners. This makes the wall feel soft or “spongy” to the touch. We use advanced infrared thermal imaging to see through your drywall. This technology allows us to identify moisture intrusion and verify stud patterns simultaneously without cutting holes in your paint. Your home’s safety is our pride! We don’t just look at the surface; we use modern tools to ensure the hidden components of your Indianapolis or Westfield property remain dry, strong, and secure for your family.
Why a Professional Inspection Outperforms a Stud Finder
A basic stud finder is a useful tool for hanging light decor, but it lacks the precision required for major structural changes or high-stakes home purchases. These handheld gadgets frequently struggle with modern building materials. They often trigger false positives when they encounter PVC vent pipes, metal electrical conduits, or even thick layers of plaster in historic Indianapolis homes. Relying solely on a blinking light to determine how many inches are between wall studs can lead to a dangerous and expensive mistake. If you accidentally drill into a live wire or a pressurized water line, a simple DIY project quickly turns into an emergency repair.
Professional inspectors provide a level of certainty that a $20 sensor cannot match. We perform multi-point assessments that look at the entire “skeleton” of the property. We evaluate the foundation, the roofline, and the wall framing as a single, connected system. This unbiased evaluation is essential before you commit to a major renovation or sign a closing contract. At 5M Inspection Services, we focus on delivering “confident decisions.” Our detailed reporting identifies exactly what is happening behind your drywall, ensuring you have the facts before you start any demolition.
Advanced Tools: Infrared and Moisture Meters
We use modern technology to see what is hidden from the naked eye. Infrared thermal imaging is one of our most powerful tools. It reveals the entire framing skeleton by detecting subtle temperature differences between the wood studs and the insulation. This allows us to verify how many inches are between wall studs across an entire room without ever touching the wall. This technology also highlights “thermal bridging” and gaps in your insulation that cause high energy bills. For homeowners in Carmel and Zionsville, where complex architectural features and vaulted ceilings are common, these advanced tools are the only way to ensure the framing was executed correctly during construction.
Next Steps for Central Indiana Homeowners
You should consider a professional evaluation if you suspect your home is settling or if you notice large, stair-step cracks in your drywall. These are often signs that the internal framing is no longer supporting the weight of the structure properly. As a family-owned and community-trusted business, we take your peace of mind seriously. We are available via text message 24/7 to answer your questions and provide the clarity you need. Your home’s safety is our pride, and we are ready to help you protect your investment. Contact 5M Inspection Services for a thorough evaluation today.
Secure Your Home’s Structural Future
Navigating the hidden framework of your property doesn’t have to be a guessing game. Knowing exactly how many inches are between wall studs allows you to mount heavy fixtures safely and identify potential structural fatigue before it leads to costly repairs. Whether your Central Indiana home follows the 16-inch modern standard or the unique, irregular patterns of a historic downtown property, understanding these “bones” is the first step toward smart homeownership. You are now equipped to spot red flags like drywall pops and use visual cues to find reliable anchor points.
At 5M Inspection Services, we treat your property with the same care as our own. We are a family-owned team of certified technical experts dedicated to helping our neighbors in Indianapolis and Westfield make confident decisions. If you suspect structural settling or need an unbiased evaluation of your home’s integrity, we are ready to assist. We offer 24/7 text availability to answer your most urgent questions. Schedule Your Professional Home Inspection with 5M Today to ensure your investment remains strong and secure for years to come. Your home is your sanctuary; let’s keep it that way.
Frequently Asked Questions
Are wall studs always 16 inches apart in Indianapolis homes?
No, spacing is not universal across all local properties. While the 2020 Indiana Residential Code standardizes modern builds at 16 inches, historic homes in neighborhoods like Broad Ripple or Meridian-Kessler often feature irregular intervals. You may find gaps ranging from 12 to 20 inches depending on the original builder’s materials. Always verify the specific layout of your room before starting a project.
Can I assume a stud is there if I measure 16 inches from the corner?
You should never assume a stud is exactly 16 inches from a corner. Builders often use “dead wood” or specialized corner blocking for drywall support that can shift the initial layout. This means the first stud in a sequence might actually be 14 or 15 inches away from the wall’s edge. Use a magnet or a knock test to confirm the wood’s exact location.
What happens if I drill into a wall and miss the stud?
Missing a stud leaves your fastener supported only by brittle drywall, which cannot hold significant weight. More importantly, you risk puncturing “phantom” obstructions like PVC plumbing or electrical conduits. If your drill bit suddenly gives way into empty space, stop immediately. Use a small probe or flashlight to check the hole for any signs of damaged utility lines behind the wall.
Are studs in older Carmel homes made of wood or metal?
Most residential properties in Carmel and Westfield are framed with wood. Metal studs are typically reserved for commercial buildings or high-rise apartments. However, you might encounter metal framing in modern finished basements. These are used for non-load-bearing partition walls because metal does not rot or warp when exposed to the higher moisture levels often found in lower levels.
How much weight can a single wall stud hold?
A single vertical 2×4 stud can support between 15,000 and 20,000 pounds of vertical compressive load. For hanging items, the strength depends on your fastener. A 1/4-inch lag bolt driven at least 2 inches into a solid stud can safely support 80 to 100 pounds. Always ensure your hardware is rated for the specific weight of your television or heavy shelving.
Is it possible for studs to be 24 inches apart in a load-bearing wall?
Yes, it is possible if the wall is constructed with 2×6 lumber. This “advanced framing” technique is allowed under Indiana code for certain energy-efficient designs. It provides more room for insulation but requires thicker vertical members to maintain structural integrity. If you are unsure how many inches are between wall studs in your home, look for 2×6 top plates in your attic to confirm the framing size.
Do I need a professional inspection if I’m just mounting a TV?
A professional inspection isn’t usually required for simple mounting, but you should call an expert if you see structural red flags. If your drywall feels “spongy” or you notice stair-step cracks near the mounting area, the underlying wood may be compromised. We provide a thorough evaluation to ensure your home’s bones are strong enough to support your expensive electronics safely. Your home’s safety is our pride!
What does ‘on-center’ mean when talking about wall framing?
“On-center” (OC) is a technical term meaning you measure from the exact middle of one stud to the middle of the next. This measurement accounts for the 1.5-inch thickness of standard lumber. When a builder follows the 16-inch OC rule, the actual physical gap of empty space between the two pieces of wood is 14.5 inches. This standardized system ensures that 4-foot wide drywall sheets always land on a solid anchoring point.